It’s been some time since the last update, and that is not because I haven’t done any work on this project. Fact is, the work that I have been doing is not really going to do well as a party conversation starter… but if you are really interested in all the steps that come with programming your own Raspberry Pi robot from scratch, feel free to read on!
Since I blew up the power circuit of the robot control board (see my previous blog), I have mainly been working on setting up a good programming environment for my robot. Since I expect the software part to become quite sizeable as time progresses, I wanted to set things up properly from the start.
Programming environment
One of the main bottlenecks in my earlier programming was that I always programmed directly on the headless Pi. Although I’m very grateful for the possibilities of nano-ing over an SSH terminal, it is quite limiting for any serious project-scale programming. Because of my existing Eclipse habits, it seemed logical to start managing the code from there. It also offers Python support with the PyDev plugin, and connecting to my Bitbucket-hosted Git repository with the Egit extension. However, setting this up took several days, since it included a full MacOs upgrade (before that, I was still stuck in 2009) and several bouts of trial and error in order to install all the proper versions and dependencies to make it work.
Hardware programming
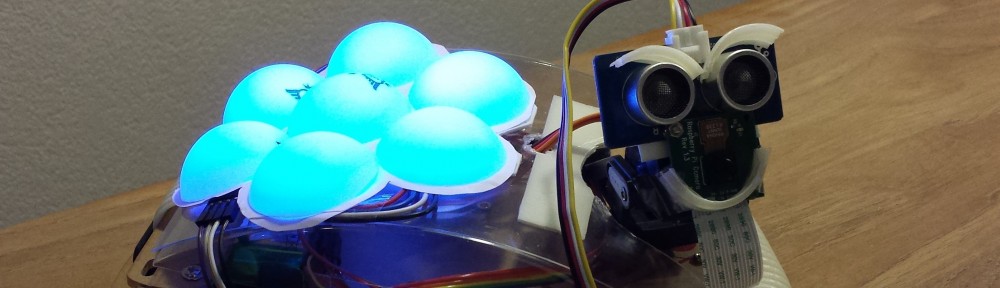
Then with the development environment set up, it was time to move to the slightly more interesting (well sort of) topic of hardware programming. Fortunately, all the components that I use come with ready libraries that can be used in a Python program. This saves me from actually having to program SPI, I2C and UART byte-level operations, and allowed me to get busy with implementing some more high-level instructions. This doesn’t yet do anything demoable yet, but it does make future robot control logic a lot more straightforward:
- LED shield – My custom-made LED shield that is really nothing more than a string of 7 pieces of WS2801. In order for the robot to make ready use of this component, I programmed a circular light spinner, a central blinking status light, and also some mood lighting. All these functions are now just one command away, complete with resource locking & preset colorcodes. And of course, it can all run in parallel with the main program. Big thumps up to Ian Smith for providing the WS2801 Python Library!
- Servomotors – In order to drive to two servos directly from the Raspberry Pi, I use the excellent ServoBlaster library. ServoBlaster specifies position in terms of percentage of signal range (0-100%), and I rather specify the position in angle. Moreover, to make the servo face exact 0 / 90 / 180 degrees with respect to the robot base required some number-wrenching. And then, my servo interface got resource locking and parallel operation as well.
- Orientation sensor – This highly complex component required the least additional logic, as the sensor actually does all the geometrical computations on its own chip and provides a complete API that is readily exposed through Adafruit’s BNO055 Python library.
- Ultrasonic distance sensor – This is such a simple component that it comes without a driver. Still, it has two issues that I wanted to solve before my robot is going to rely on this information:
- The reported distance does not correspond with my tapeline… and the difference cannot be expressed by a simple multiplication factor. So, I measured sensor output for a range of known distances, then fitted a formula (by reduction of mean error), and now the output is true to the nearest full centimeter.
- Another issue is that the ultrasonic signal sometimes spikes for no apparent reason, giving incidental erroneous readings of 0 or max range. I addressed this by introducing “continuous reading” mode, that continuously reads the sensor value in the background (multi-threading ftw!), and when the main program requests a distance, it reports the average distance over the last couple of readings, ignoring any 0s and maxes. This effectively negates incidental spiking.
In the process of getting all this to work, my Python skills needed to get to the next level. So far, I had never done anything with package structure, classes or multithreading. The Hitchhiker’s Guide to Python turned out be an invaluable companion, and it all seems to be going OK now! In order to really make sure that it does, and that it will continue to do so as I expand and combine functionality, I’m planning on creating some unit tests next. Should be about done by the time I get my motors in business again, hopefully less than two weeks from now…
So, wasn’t this the most boring post you ever read? Or did you actually pick up some useful pointers for your own project? Please let me know in the comments below!