This Christmas, I got myself a nice never-grow-up toy: the GoPiGo robot kit from Dexter Industries (€ 76, http://www.dexterindustries.com/gopigo/), with servo kit (€ 16) and ultrasonic sensor (€ 20). The intent is to make an autonomous robot car. I have some experience with the Raspberry Pi, and some elementary grasp of electronics, but these are my first steps in the realm of robotics. What follows is my account of getting acquainted with this kit.
List of parts
As this is a kit, it is supplied as a box full of parts. The base kit consists of:
- Acrylic frame
- Robot controller board
- 2 motors + cable
- 2 wheels + encoders
- Caster wheel
- Battery box + cable (for 8x AA)
- Various bits to bolt it all together
I also opted for some add-on extras (how else could it ever be autonomous):
- Servo kit + cable
- Ultrasonic range sensor + cable
And finally, some essential parts to complete it came out of my own cupboard:
- Raspberry Pi B+
- 8GB microSD card
- Wifi dongle
- 8x AA battery (rechargeable)
Assembly
The supplier offers assembly instructions in written format and video format. The video is very complete and easy to follow, and actually offers some tips & tricks that are not covered in the instruction text. The video is not cut in any way; you get to witness minute after minute of the instructor trying to peel the protective paper of the acrylic parts. I guess this is a good thing when you are playing the video while doing the assembly, you can basically follow it “live”, without having to pause the video.
The assembly process is slightly awkward and requires some patience and very nimble fingers. However, it is simple enough as it does not involve any advanced skills or tools. One part that is not covered in the instructions is how to get the servo unit to face center; it needs to be connected to the operational base, and be programmed to center value so that the unit can be attached straight on the chassis.
For completeness: putting up the ultrasonic sensor is such a breeze that I almost forgot to mention it.
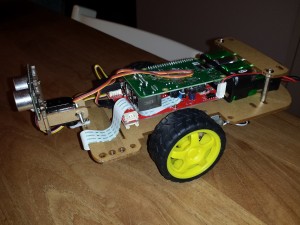
The assembled GoPiGo base, with servo kit & ultrasonic sensor. Note that the top plate is not mounted, I did not remove the protective paper from the acrylic, and that broad white cable next to the servo unit belongs to the RPi camera unit (not covered in this post)
Robustness
The assembled base unit is reasonably sturdy as long as you don’t grab it by the wheels or drop it from the table. The optional servo is a different story; it is attached to the base directly with the servo plastic bit, with the whole unit hovering in the air above it. This makes for a very flimsy joint. Additionally, the servo is fastened in its casing with a bolt that is more than a centimeter too long. This serves no purpose, and the excess length stick out from the unit and snags cables when turning the servo. I attached the servo to the bottom chassis plate in order to give the whole unit the lowest possible height clearance, but this puts it in such a protrusive position that the delicate servo unit becomes the main bumper in case of head-on collisions. Putting the servo on the top chassis plate does not really solve the problem: in order to properly protect its head, this robot car will need a custom bumper.
Update 29-01-2016: For the final build of my first prototype, I did not use any part of the GoPiGo servo kit; rather, I installed a custom pan/tilt system that is powered by two servos. The complete alternative system was cheaper than the GoPiGo servo kit as well.
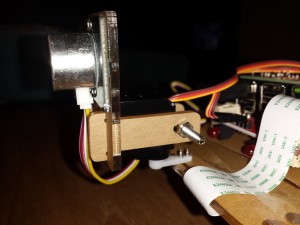
Close-up of the servo “head”. Notice the flimsy “neck” joint, the surplus bolt length and the 4 cm forward protrusion
Install software
Dexter Industries offers a custom pre-installed SD card that presumably makes the software part very easy. As I wanted to preserve all the previous personalizations that I did with my Pi, I chose the option of doing the installations on top of my existing Raspbian Wheezy system. While I went to some trouble trying to get this working, in retrospect this can all be attributed to the fact that I did not start the process with a fully updated/upgraded system. After this realization, I got everything in working order without further ado. I plan to use the platform’s Python API, and it also supplies some Python test programs that you can use to immediately remote control the car.
Operation
Initial trials with operation of the unit were slightly disappointing:
- The robot does not move in a straight line. At all. Do not think you can leave out the encoders (as is suggested somewhere in the assembly instructions) as this will leave you with a unit that is uncontrollable and no way to remedy it. On top of that, the provided routines that are supposed to make it go straight with the aid of the encoders do not help enough, still will not move really straight. The only way I got it to go something resembling straight is writing my own movement routine, using direct encoder readings and continuous adjustment of left/right motor speed ratio. A true straight movement can possibly be achieved only by the additional purchase of a compass breakout.
- The readings from the ultrasonic sensor can be quite erratic. Periodical ranging while approaching an obstacle can give sort of decent readings for a moment, and then suddenly switch to all 600+ another, making the car crash into the obstacle. In order to use this for reliably finding a path around a room will require some fault tolerance, let alone mapping the room…
- Another thing about the range detection is that it only polls in a horizontal plane… and cannot look down to detect unpassable thresholds. So, it keeps trying to move forward into unobstructed space even though the thing is definitely blocked. Two possible workarounds to this problem both require additional hardware purchases:
- Either install a pan/tilt “head” unit (enabling look up/down/left/right)
- Or install an IR proximity sensor that monitors the floor immediately in front of the robot
- The servo jitters while it is supposed to just stay in set position. I expected the dedicated control board to supply a steady PWM to the servo… but this seems not to be the case here.
Possibilities for extension
The Raspberry Pi is attached to the control board by turning it upside down and sticking its prototyping pins directly in a 26-pin header on the control board (the extra 14 of the RPi B+ just remain bare). The good thing is, next to that header are 26 holes that could be used to mount a pin header to break out the RPi GPIO’s for all kinds of possible extensions. At this point I’m just not sure how many of the pins cannot be used because of interference with GoPiGo control signals, I could not really find documentation about this.
Update 29-01-2016: after some experiments, it appears that the GoPiGo uses only the I2C channel (physical pin 3 & 5), and that channel is not “used up”: multiple I2C devices can be hooked up as long as they have different logical addresses. All the other RPi pins are free to use for prototyping as well.
The control board itself contains some Grove connectors for additional add-ons: there is a serial port (possibly for a compass?), an analog port (in my case used for the ultrasonic sensor), a digital/PWM port (additional servo to enable pan/tilt control?) and an I2C port (chaining other MCUs could be useful). Additionally, at the bottom there is a pin header exposed that allows connection of up to 3 line-follower sensors. For complete reference please check: http://www.dexterindustries.com/GoPiGo/learning/hardware-port-description/.
Conclusion
Easy to get started with robotics? In terms of assembly and installation, yes. Sample code, reference material, learning resources and community forum are there to help with the programming part.
How does this kit compare to other RPi robot kits? I don’t really have anything to compare against… as this is the only RPi robot kit available in the Netherlands.
Just hope that the sensor setup can indeed be tweaked enough to turn this trike into a proper autonomous exploration vehicle, because the current package will just not cut it… stay tuned for the next update!
Do you have a different experience with the GoPiGo robot kit, or have a question about it? Let me know in the comments below!
Updated to reflect actual user experience:
– Servo kit: rather go for an alternative instead
– Prototyping pins: everything is available for custom extensions